Hi there! If you’re a Nepali student planning to study abroad, you’ve likely heard about the No Objection Certificate, or NOC. You would need to apply NOC online, to study aboard.
When I first started my journey to study overseas, I was a bit overwhelmed by the paperwork, especially the NOC.
But don’t worry; I’m here to share my experience and guide you through how to apply NOC online in Nepal.
It’s a crucial step, and with the right approach, it’s quite manageable.
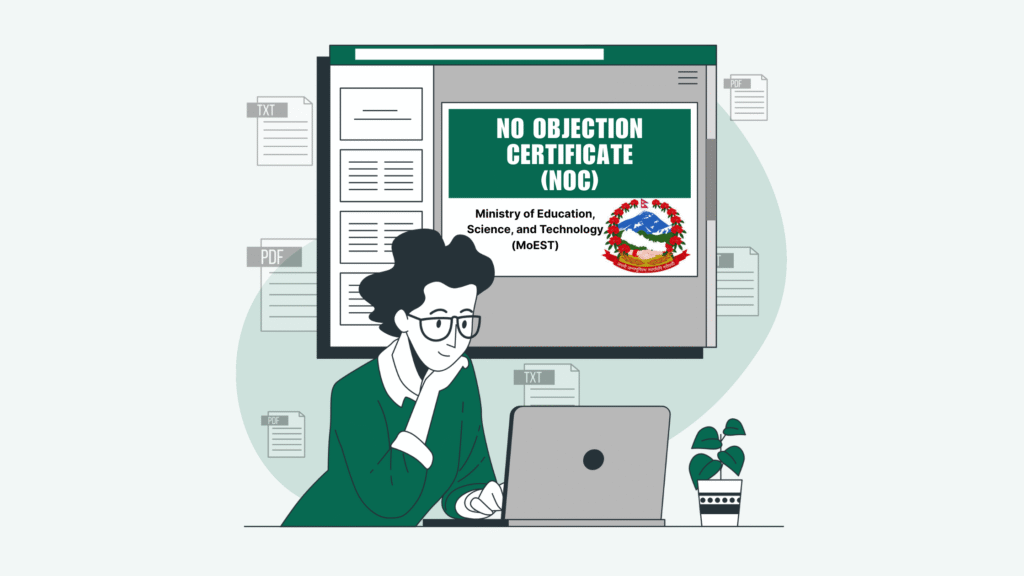
The NOC is an official document issued by the Ministry of Education, Science, and Technology (MoEST) in Nepal.
It confirms that the government has no objection to you pursuing your education abroad.
Without it, you can’t make payments to your foreign university or proceed with your student visa application.
Why the NOC Matters?
The NOC serves several key purposes:
Legal Authorization: It shows the Nepalese government approves your study abroad plans.
Financial Transactions: Banks require the NOC to process payments to the foreign institution listed in the certificate.
Visa Requirement: Most countries need the NOC as part of your student visa application.
Institution-Specific: You can only pay the institution named in the NOC, so if you’re studying at multiple institutions, you’ll need separate NOCs.
Documents You’ll Need to Apply NOC Online
Before you start to apply NOC online, gather these documents to ensure a smooth application process. I learned the hard way that having everything ready saves time:
Offer Letter: This could be an I-20 (for the USA), Letter of Acceptance (LOA), or any admission letter from your foreign university.
Academic Certificates: Include your transcripts, migration certificate, and provisional certificate. Make sure they’re notarized if required. If you study in foreign and wondering how you can get a TU equivalence, then refer to this blog – How to Apply for TU Equivalence Online: A Step-by-Step Guide.
Language Proficiency Certificates: If you took tests like IELTS or PTE, have your score certificate ready (optional but helpful).
Passport: A clear scanned copy of your passport.
Citizenship Certificate: A scanned copy of both sides of your citizenship certificate.
Passport-Sized Photo: A recent photo, ideally in digital format for upload.
I scanned all my documents in PDF or JPEG format, ensuring they were under 5 MB, as the portal has size limits.
Step-by-Step Guide to Apply NOC Online
Here’s how I applied for my NOC online, broken down into clear steps.
You can follow these on the official NOC portal at No Objection Certificate.
1. Visit the Official Portal
Visit the official NOC application portal i.e. Ministry of Education, Science, and Technology (MoEST).
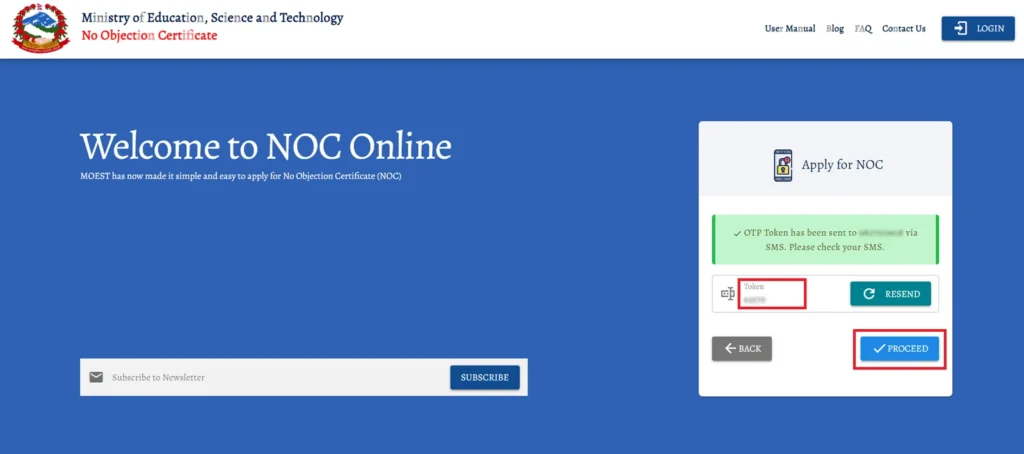
2. Enter Mobile Number and Email
You’ll need to enter your NTC mobile number; Make sure the service provider is NTC, otherwise you will not get OTP.
After submitting, you’ll receive a one-time password (OTP) via SMS.
Enter the OTP to verify your mobile number.
If you don’t receive it within two minutes, click Resend to get a new one.

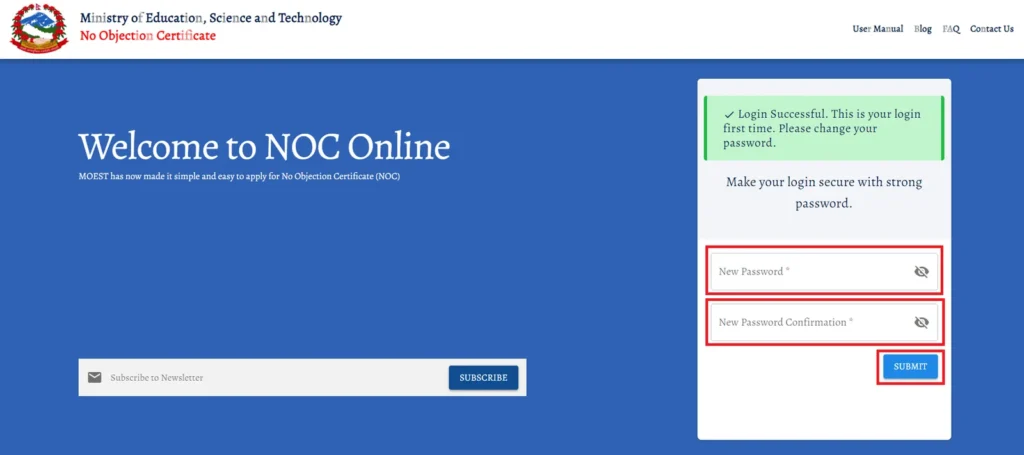
3. Set a Password
Create a secure password for your account.
I chose something easy to remember but strong, then confirmed it by entering it twice.
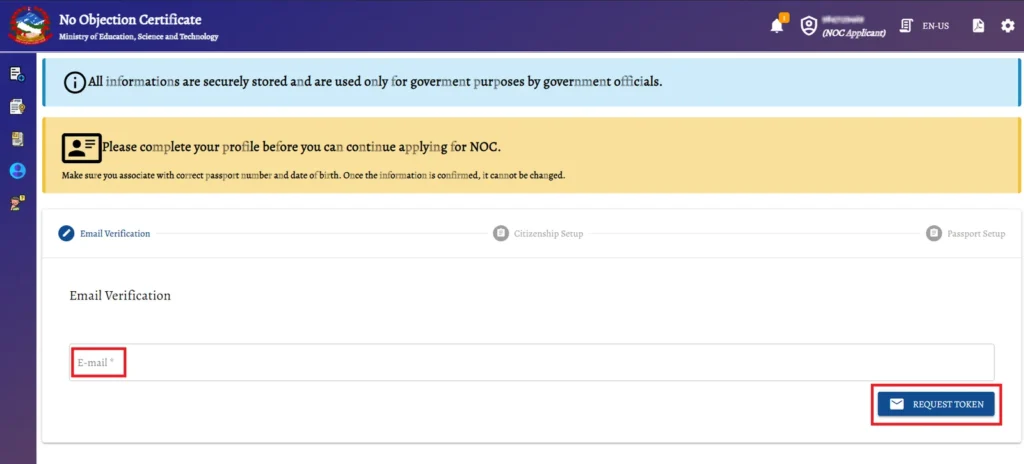
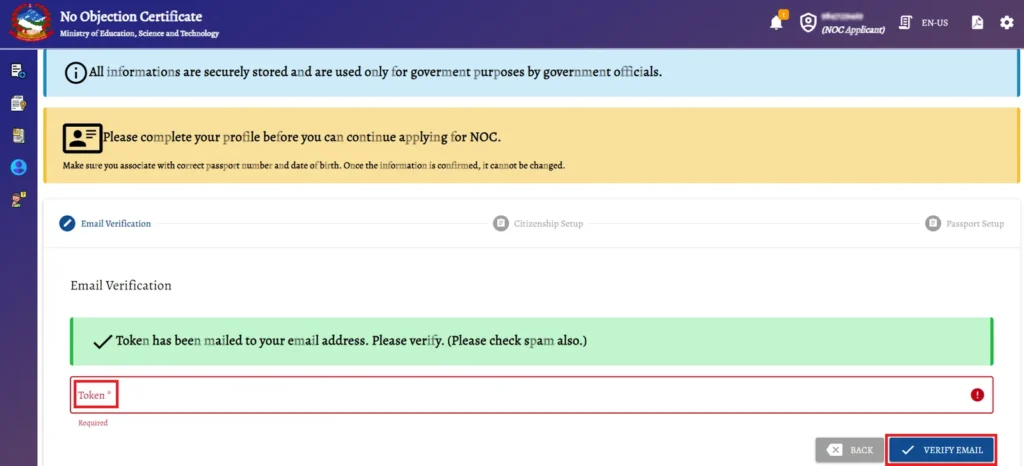
5. Verify Your Email
Next, provide your email address.
A verification token will be sent to your inbox (check spam if needed).
Enter the token and click Verify Email to confirm.
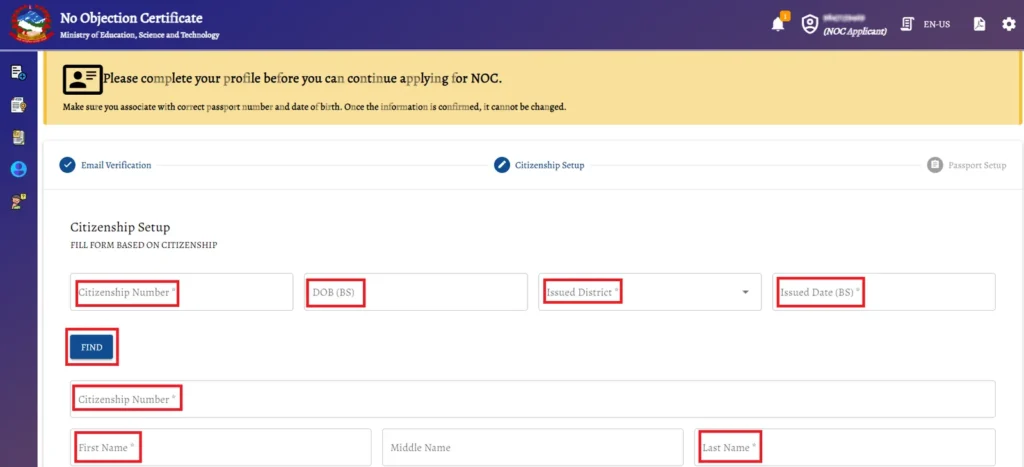
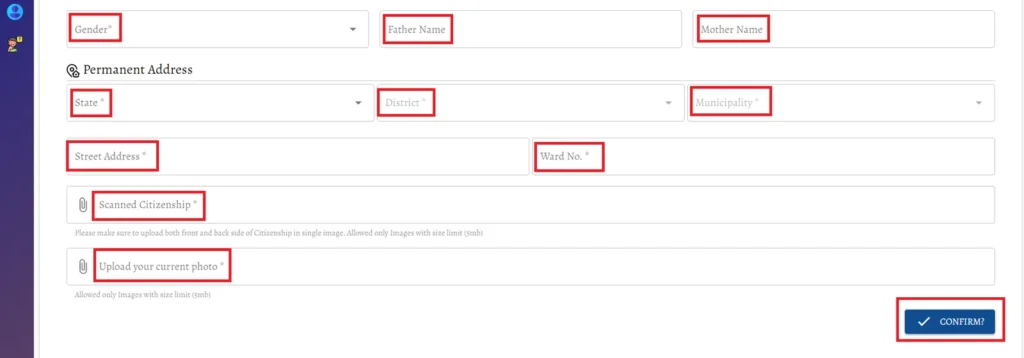
6. Complete Citizenship Details
Fill in your citizenship details, including your citizenship number, date of birth, district of issue, full name, parents’ names, and permanent address.
Then, upload a combined image of your citizenship certificate (front and back) and your passport-sized photo.
Ensure the file is under 5 MB.
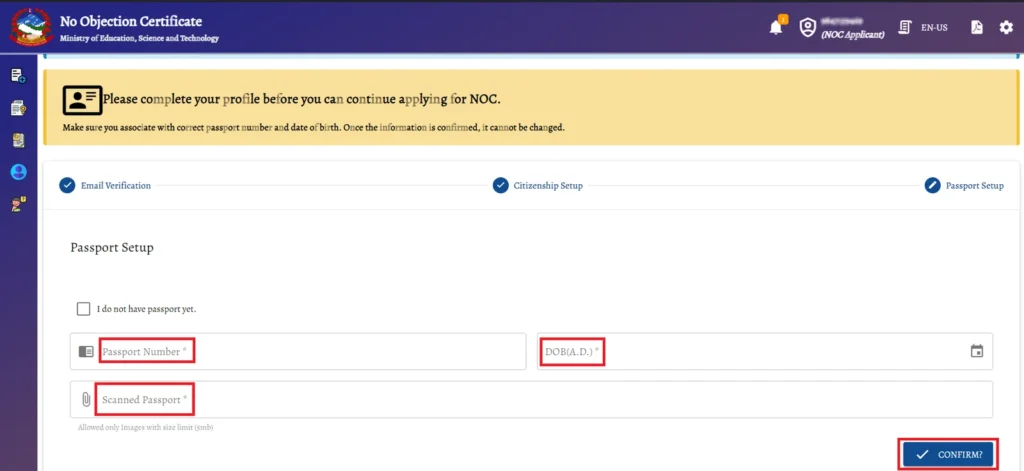
7. Add Passport Details
Enter your passport number and date of birth, then upload a scanned copy of your passport.
I made sure the scan was clear to avoid rejection.
8. Provide Academic Background
Select the country where you previously studied, your academic level (e.g., +2, Bachelor’s), and field of study.
If you have a previous NOC, enter its number; otherwise, skip this part.

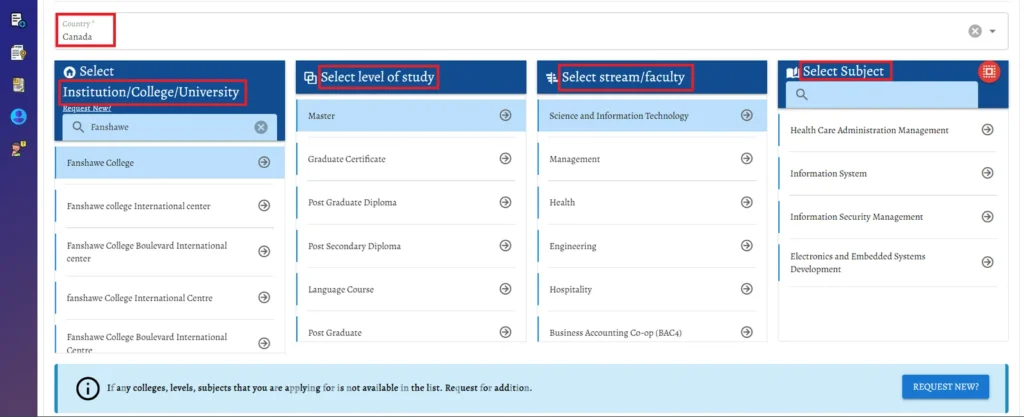
9. Specify Future Study Plans
First, choose your study destination (e.g., Canada, Australia), and then select your institution, level of study (e.g., Bachelor’s, Master’s), stream/faculty, and specific subject.
However, if your institution isn’t listed, click Request New to add it.
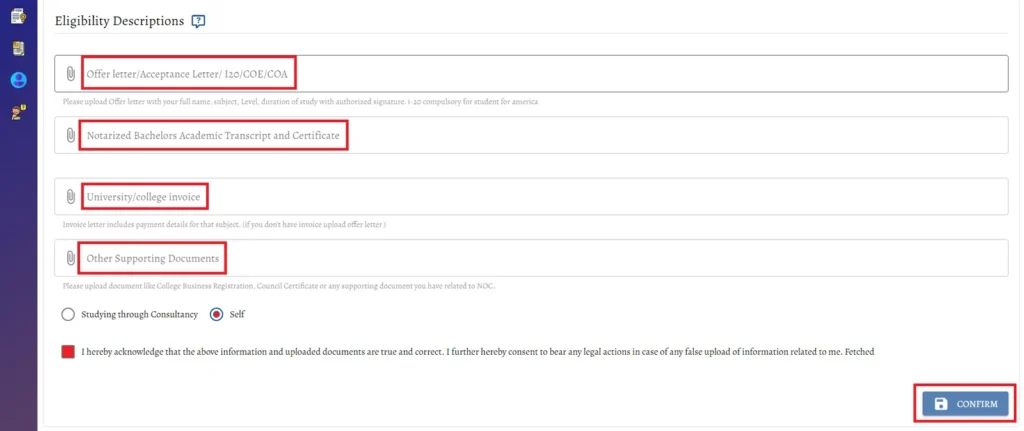
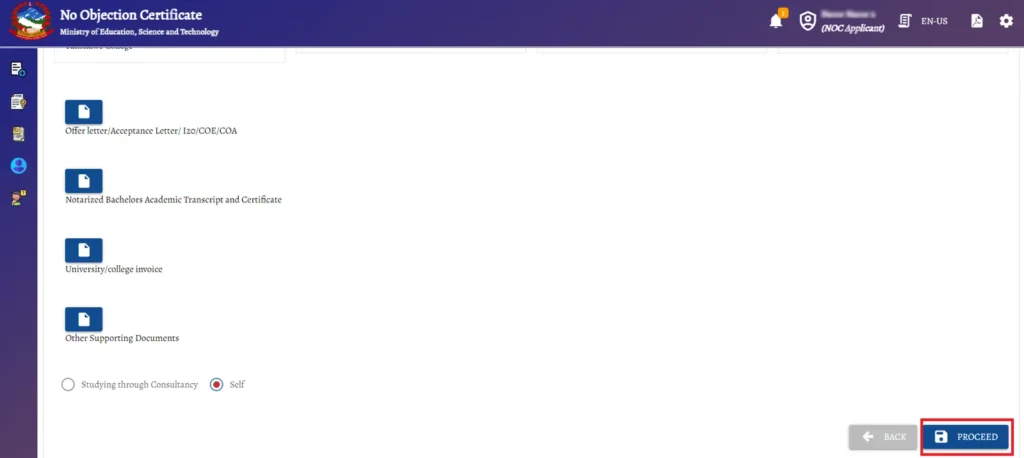
10. Upload Documents
Next, upload your offer letter, notarized academic transcripts, and any supporting documents like language test results.
As for the application type, I marked Self since I applied on my own; however, select Studying through Consultancy if you’re applying through an agency.
11. Review and Submit
Double-check all details and documents.
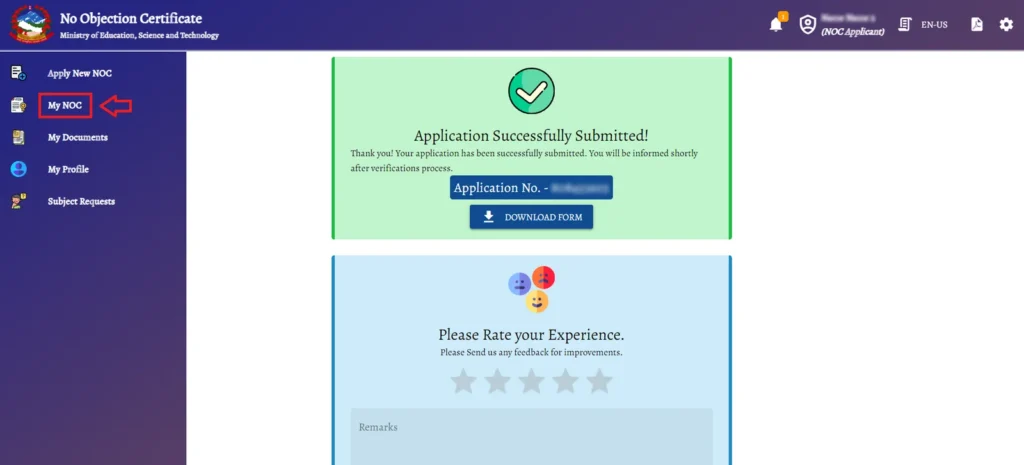
Once you’re sure everything is correct, click Proceed to submit.
You’ll see a confirmation page with an application ID and a Download Form button.
I downloaded the form immediately for my records.

What Happens After You Apply NOC Online
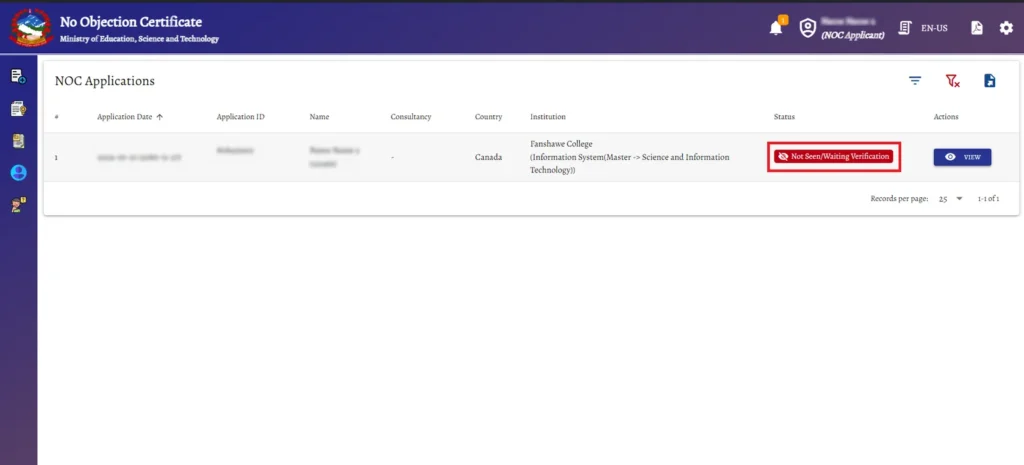
After submitting, you can then track your application status on the portal under the My NOC section.
Initially, it’ll show Not Seen/Waiting for Verification.
In my case, it took about 3–5 days for the status to update to Application Verified/Waiting for Payment.

1. Making the Payment
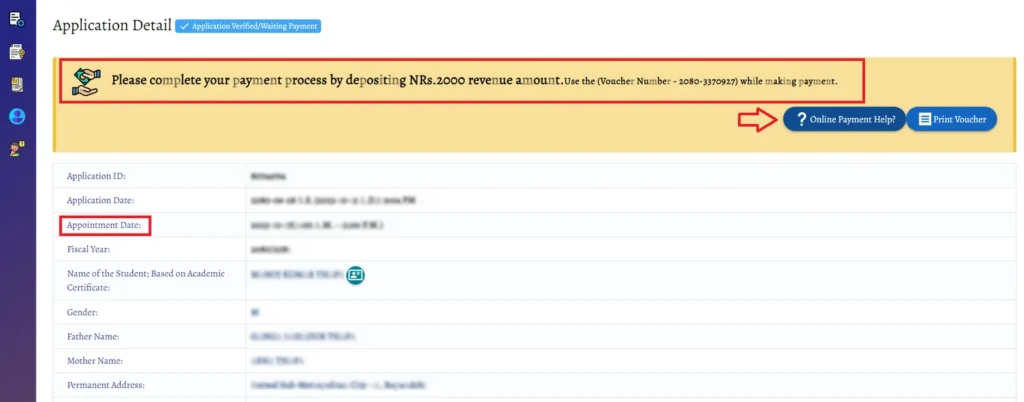
2. Scheduling an Appointment
After payment, the portal provides an appointment date and time to collect your NOC from the MoEST office in Sanothimi, Bhaktapur.
I marked my calendar to avoid missing it.
3. Visiting the NOC Office
On your appointment day, bring these documents:
Offer letter or I-20
Original and photocopies of academic certificates
Payment receipt
Downloaded NOC form
Original and photocopy of your passport and citizenship certificate
Tips for a Smooth Application Process
- Double-check your documents: Make sure all the documents are properly scanned and readable.
- Accurate Information: Provide correct and truthful information to avoid any rejections or delays.
- Follow Up: Keep an eye on the portal regarding any updates or requests from NEC.
However, if you’re facing any issues with your NOC, then reach out to the Ministry of Education, Science and Technology (MoEST) using the details below:
Contact Details for NEC:
- Ministry of Education, Science and Technology (MoEST)
- Sanothimi, Bhaktapur, Nepal
- Phone: + 01-6635419
- Email: noc@moest.gov.np
- Website: https://noc.moest.gov.np/
Frequently Asked Questions (FAQs)
What is a No Objection Certificate (NOC)?
The NOC is a document from the Ministry of Education in Nepal that permits you to study abroad, ensuring no legal barriers.
Why do I need an NOC to study abroad?
It’s required for transferring tuition fees to foreign universities and for your student visa application. Without it, banks won’t process international payments.
How long does it take to get the NOC?
Verification typically takes 3–7 working days. After payment, you’ll get an appointment to collect it in person.
What if my application gets rejected?
Ministry of Education, Science and Technology (MoEST) will tell you why and what to fix. You can reapply after correcting it; plenty of people do, and it works out.
What if my university isn’t listed on the portal?
Click “Request New” to add your institution. Provide the details, and the NOC team will verify and add it within a few days.
Can I edit documents after submission?
No, once you click Proceed, edits aren’t allowed. Therefore, review carefully before submission.
Can I ask someone else to pick up my NOC on my behalf?
Yes, you can ask a close guardian or relative to collect your NOC for you. They will need to bring all your original documents required for the NOC application, along with their own citizenship certificate. It’s recommended to include a signed letter of authorization to avoid any issues.