So, you’re ready for NEC License Exam Registration? I totally get how exciting and maybe a little stressful, that can feel.
When I went through it, I found that breaking it down into steps made it so much easier.
Below, I’ll walk you through every single part of the NEC license exam registration process in detail, based on my own experience. Let’s get started!
Before You Begin: Check Your Eligibility
First things first, you need to make sure you’re eligible.
You’ll need a Bachelor’s Degree in Engineering from a university recognized by the Nepal Engineering Council (NEC).
You can find the list of recognized universities on the NEC website.
If your university isn’t there, don’t stress, just call or visit the NEC office to sort it out.
I had to double-check this myself since I studied abroad, and it gave me peace of mind.
Gather Your Documents Early
Before you even start the online process, get your documents ready.
Trust me, this saves so much hassle later.
Everything needs to be notarized, so here’s what you’ll need:
- Nepalese Citizenship Certificate (notarized copy)
- SEE Mark Sheet (notarized copy)
- SEE Character Certificate (notarized copy)
- 10+2 Transcript (notarized copy)
- 10+2 Character Certificate (notarized copy)
- Bachelor’s Transcript (notarized copy)
- Bachelor’s Character Certificate or proof of study duration (notarized copy)
- Bachelor’s Degree or Provisional Certificate (notarized copy)
- Equivalence Certificate (if you studied abroad, notarized copy)
- One passport-size photo
If you studied abroad and need your degree recognized in Nepal, you’ll likely need an equivalence certificate from Tribhuvan University (TU).
This blog provides an easy-to-follow, step-by-step guide on how to apply for a TU equivalence certificate.
I had to run around to get mine notarized, so my tip? Start early and keep digital copies ready for uploading.
Step-by-Step NEC License Exam Registration Process
Now, let’s go through every step of the NEC license exam registration process.
I’ll explain each one in detail so you know exactly what to do.
1. Create Your Account
Head to the NEC registration portal.
You’ll need to enter:
- Your full name
- Your contact number
- An email address you check often
- A password you’ll remember
Once you’ve filled that in, hit register and log in with your new credentials.
I was super eager to start, but I had to wait a few minutes for the next part; patience is key here!


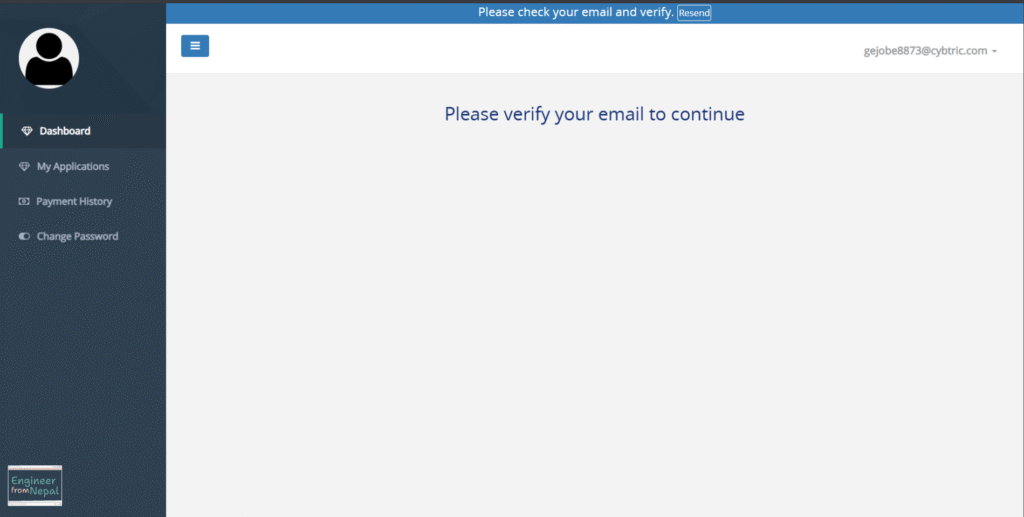
2. Verify Your Email
After logging in, check your email for a verification link from NEC.
It might land in your spam folder, so look there if you don’t see it.
Click Verify Email, and you’ll be sent back to the portal to log in again.
This step took me just a couple of minutes, but it’s a must-do.


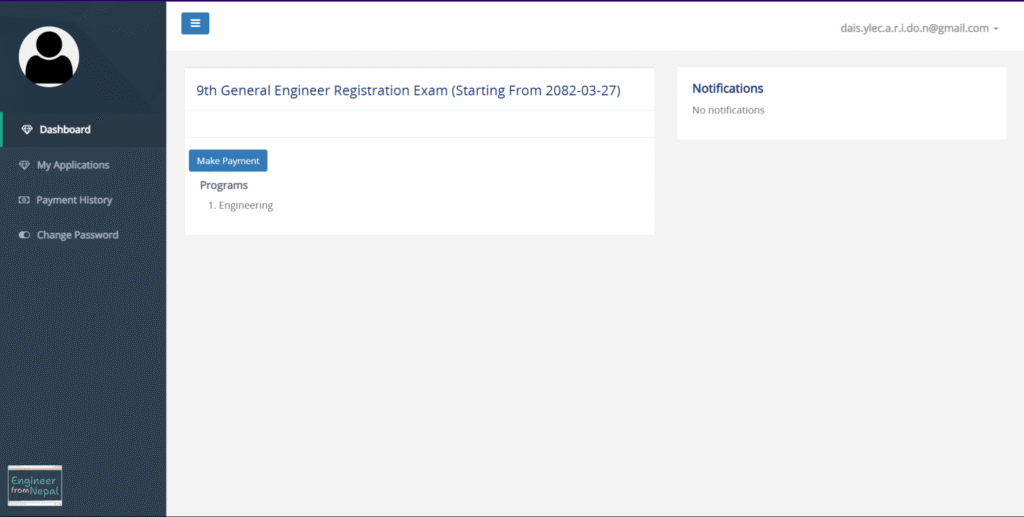
3. Make the Payment
Once you’re logged in, you’ll see your dashboard. Look for the Make Payment button and click it to pay for the NEC exam.
This option is only available when applications are open. Check the blog NEC License Exam Dates for the exam schedule.
The exam fee is NRs. 2,500, and you’ve got two options: Khalti or Connect IPS. I went with Khalti; it was quick and easy.
Just make sure your account has enough funds, then follow the prompts to pay.
After it’s done, you’ll be redirected to your dashboard, and it’ll show a Paid status.
That’s your green light to start registering!

4. Start Registration
On your dashboard, click Start Registration to open the application form.
This is where the real NEC license exam registration begins.
You’ll be filling out a bunch of details, so take your time to get it right.

5. Enter Personal Information
Here, you’ll need to fill in:
- Your full name (in English and Nepali; I used ChatGPT to help with the Nepali part)
- Gender
- Date of birth (in AD and BS formats; try Hamro Patro for BS dates)
- Permanent address (district, local level, ward number)
It’s pretty straightforward, but make sure everything matches your documents.
I double-checked mine just to be safe.

6. Provide Identification Details
Next, enter your ID info:
- Citizenship number
- National ID number (if you have one)
- Place of issue
- Issued date (in AD and BS)
This part’s quick, but accuracy matters.
I almost mistyped my citizenship number, so go slow here.

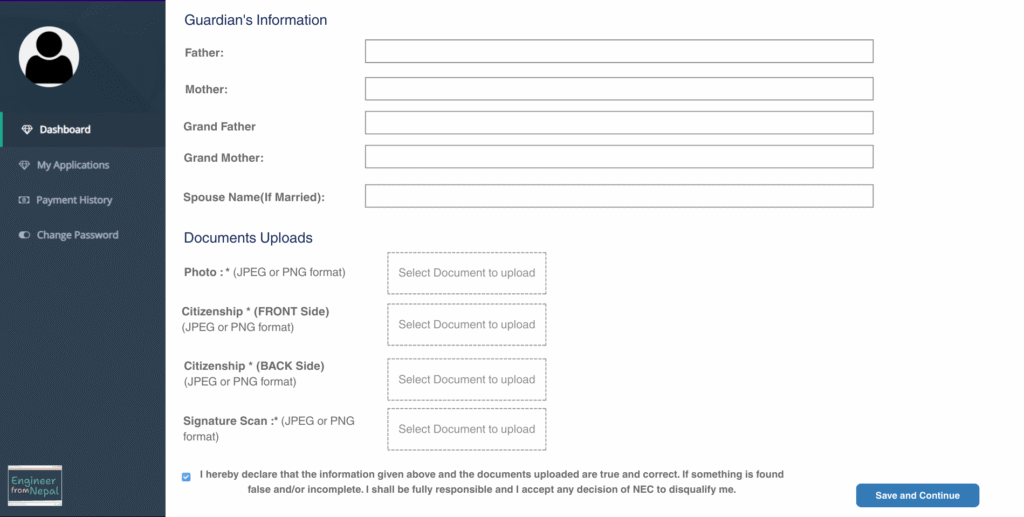
7. Fill in Guardian Information
Now, you’ll add details about your family:
- Parents’ names
- Grandparents’ names
- Spouse’s name (if you’re married)
It felt a bit tedious to me, but it’s required.
Just make sure the spellings are correct; I had to correct my dad’s name after a typo!
8. Upload Initial Documents
Time to upload some files:
- Your passport-size photo
- Front and back of your citizenship certificate
- Your scanned signature
These need to be in JPEG or PNG format and super clear.
My first signature upload was blurry, so I redid it with a better scan.
Once everything’s uploaded, tick the box to accept the terms and conditions, then click Save and Continue.
9. Enter Educational Details
You’ll need to list your education from SEE to Bachelor’s.
For each level (SEE/SLC, 10+2 Science, Bachelor’s), include:
- Country where you studied
- Institute name and address
- Year passed (in AD)
- Roll number
- Percentage or CGPA
For your Bachelor’s, add the degree, start year, faculty, and the date you got your provisional degree.
If your university isn’t listed, tick the university is not listed here and reach out to NEC for help.

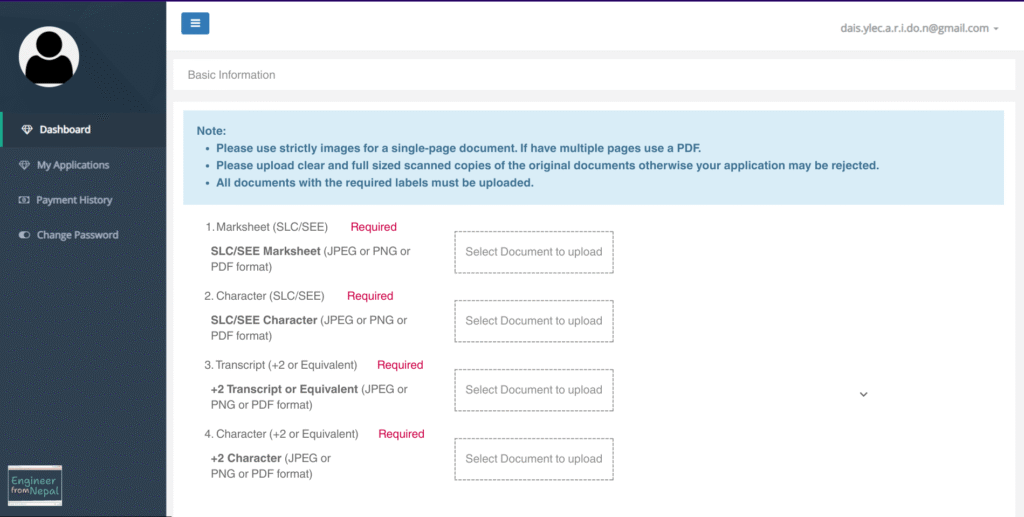
10. Upload Educational Documents
Now, upload your notarized educational docs:
- SLC/SEE Marksheet (image)
- SLC/SEE Character Certificate (image)
- 10+2 Transcript (image)
- 10+2 Character Certificate (image)
- Bachelor’s Transcript (image or PDF if it’s multiple pages)
- Bachelor’s Provisional Degree (image)
- Bachelor’s Character Certificate (image)
- Left and Right Thumbprints (images)
If you’ve got optional docs like an equivalence certificate, upload those too.
Make sure everything’s clear; a friend of mine had a delay because one file was fuzzy. Click Save and Continue to Next Step when you’re done.


11. Additional Documents (Optional)
If you have extra documents to add, click Add New Documents and upload them (images for single pages, PDFs for multiple pages).
If not, just hit Skip and Continue to Next Step.
I skipped this since I had everything covered earlier.

12. Review and Apply
Take a moment to check your application details.
If everything is correct, click the Apply button to send it off.
Need to make changes? You can modify your application before submitting. Once you’re ready, hit Apply to proceed.

13. Select Your Exam Center and Finalize Your Registration
When you’re ready to submit, you’ll be prompted to choose an exam center from the list.
Pick the one that works best for you; maybe the closest or most convenient location.
Once you’re set, click Save and Submit Information to complete your NEC license exam registration.
Right after, you can download your application details and confirmation page from your dashboard.

After Submission
NEC will take about a week to validate your documents.
If there’s an issue, they’ll contact you to re-upload specific documents, so keep an eye on your email.
Once approved, you’ll get your hall ticket a week before the exam. Download it from your dashboard and bring it to the exam center.
That’s it! You’re all set for the NEC license exam.
I hope this guide makes the process as smooth for you as it eventually was for me.
Tips for a Smooth Application Process
- Double-check your documents: Make sure all the documents are properly scanned and readable.
- Accurate Information: Provide correct and truthful information to avoid any rejections or delays.
- Follow Up: Keep an eye on the portal regarding any updates or requests from NEC.
If you’re facing any issues with your NEC license exam registration, reach out to the Nepal Engineering Council using the details below:
Contact Details for NEC:
- Nepal Engineering Council (NEC)
- Minbhawan Marg, New Baneshwor, Kathmandu, Nepal
- Phone: +977-01-4520655, +977-01-4520656
- Email: info@nec.gov.np
- Website: https://nec.gov.np/
Conclusion
And that’s the whole process!
The NEC license exam registration can feel like a lot at first, but once you break it down, it’s totally doable.
My biggest tip? Stay organized and double-check everything before you submit.
For the latest info, always check the NEC registration portal. You’ve got this!
Frequently Asked Questions (FAQs)
What if my university isn’t listed?
Contact the NEC office; they’ll guide you. You might need extra documents, especially if you studied abroad. It’s fixable, so don’t worry!
Can I change my documents after submission?
Nope, not after they’re approved. That’s why reviewing before submitting is so important. If NEC finds an issue during validation, they’ll let you re-upload then.
How long does validation take?
About a week. If they need anything from you, they’ll email, so stay on top of it.
What if my application gets rejected?
NEC will tell you why and what to fix. You can reapply after correcting it; plenty of people do, and it works out.
How much does it cost to register for the exam?
The exam fee is Rs. 2,500, paid online via Connect IPS or Khalti during the NEC license exam registration process.
What happens after I pass the exam?
After passing, you’ll pay a registration fee of NRs. 5,000 plus NRs. 200 for an ID card (total NRs. 5,200) to complete your registration as a licensed engineer with the NEC.